Helping the Homeless
INTRODUCTION
Homelessness in your local area is on the increase. You notice more and more people on the streets, you’re not sure how best to help and there is so much conflicting advice; some people tell you to give money, others suggest food, time, or asking the person what they need. What you are certain of is that you feel it important to do your bit.
You start working within the events team at your local homeless charity. In an effort to raise funds you are tasked with helping out with the organisation of a big sleep out. A sleep out is where people gather and are sponsored to sleep outside overnight in an effort to raise money for the cause.
The date has been set for in exactly 6 months, the weather is forecasted to average 10 degrees Celsius and heavy rain showers are predicted – conditions that people who are homeless have to face regularly.
There is space for some kind of additional initiative to take place at the event, your boss gives you the brief to create some kind of engaging activity that can generate some money for the cause and complements the main sleep out event.
TASKS
Your task is to take the time to understand homelessness and create a sensitive and suitable activity to go alongside “The Big Sleep Out”. You should take time to take your idea from conception and translate it into a practical action plan. You will present your activity proposal in a pitch to your boss. Good luck!
PROCESS
Step 1
Research. In order for you to create a suitable activity it is important that you have some insight into homelessness.
- You should research and bullet point 3 causes, effects and solutions of homelessness.
- Investigate a Case Study. Sleep Outs are not a new concept, they have been done before! Maybe you have even participated in one? You want to understand the tone of the main event and how your activity will be an extension of it, you should find and investigate a case study of one which has been previously completed. What can you learn from it? What goes on alongside these kinds of events? How does it help the overarching aim? Note down and discuss/think deeper about your findings. A starting point can be found here and here.
Step 2
Idea generation
The Clouds
Your starting to understand the bigger picture of homelessness and feel more confident about putting on a supporting activity. It’s time to dream up some fantasy activities and a remove the limits to your ideas! Unicorns? They exist! So your task is to, in a group or independently, dream up a list of 10-12 ideas for an activity that could take place at the sleep out. Keep in mind that these ideas can be as extreme and unattainable as you imagine!
Into Reality
You are now going to bring your 10-12 ideas from the clouds and into reality. Your colleague hits you with the numbers, you have a budget of £1000 (1186 euros). Discuss the list of ideas in detail…list for each of them 1) the barriers to making this idea impossible 2) how can this idea be scaled down and made possible? 3) what features of your ideas could you use in another more realistic way? From these scaled down and more realistic dream ideas, select one to take forward. Perhaps this process would benefit from using the SWOT analysis approach.
Step 3
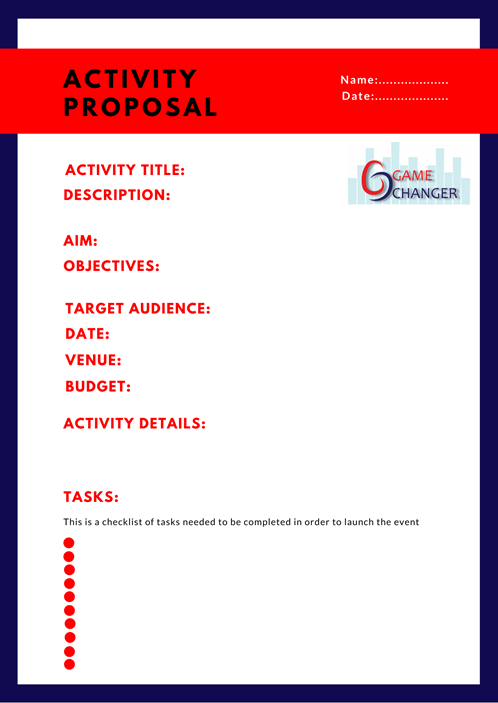
Putting the vision on Paper. Now the vision is starting to take shape it’s time to record it in an outline. It is like a roadmap, so that someone who has no background knowledge of the topic could read your proposal and understand the mission of your activity. Think about your activity’s aim, objectives, description, and target audience. Setting clear goals is key to measuring the success of your activity. A worksheet is provided to structure your proposal.
1. Name the activity – This can change but give your project a title and the start of an identity
2. Tell a Story – A brief description of the idea which will hook the reader, make it fabulous!
3. Aim – This is the overall purpose of your activity. Usually long term.
4. Objectives – So if the aims are the “what” then objectives are the “how”. These are the actions you will take to help achieve the aim.
5. Target Audience – The group of people your activity is aimed at.
6. Date – When is the activity
7. Venue – Where it is!
8. Budget
9. The Structure of the activity – this is a more detailed examination of the activity
10. Tasks – A checklist of actions required in order to achieve delivering the activity and a note of the timescales.
Inspiration for activity ideas can be found here and here.
Step 4 Branding and Identity. Now you have the creative freedom to design marketing materials for your activity. You should make a digital flyer which will be posted on social media to advertise the event. You also have the opportunity to generate two other designs for products of your choice that you can either sell at the event or advertise your activity. In addition, you have access to the logos of the sleep out event which you should include in your marketing materials. Use Canva to create your marketing materials.
Step 5
Craft Your Pitch. Now it’s time to present your idea back to your boss. Imagine you are both in an Elevator, you have to pitch your idea in the time it takes the elevator to go from the bottom floor to the top – roughly 2 minutes. Get her onboard to support your idea and its delivery! Use this video and this and this article for guidance.
EVALUATION
Hopefully this task has given the space for you to take the initiative! Please fill in this short evaluation form: https://forms.gle/LxX517p4eapXbg2U8
On completion of this webquest, learners will develop:
Knowledge:
- Factual knowledge about how to plan to achieve goals that are set in a professional capacity.
- Factual knowledge of how to develop a personal action plan.
- Factual knowledge of how to develop an elevator pitch for networking.
Skills:
- Identify opportunities to take the initiative and add or create value locally.
- Apply SMART Goals to set short-term, medium-term and long-term professional goals.
- Design milestones to assess progress towards goals.
- Synthesize goals and milestones to develop a personal action plan.
- Evaluate progress towards achieving these goals.
- Work independently to achieve goals.
- Adapt to unforeseen changes.
- Estimate unintended outcomes of risks, before making professional decisions.
- Develop a professional elevator pitch.
- Practice delivering elevator pitch to others
Attitude:
- Appreciation of the motivation required to achieve goals.
- Willingness to work to achieve goals.
Awareness of the skills needed to respond to unforeseen circumstances.
CONCLUSION
Through completing this Advanced-level webquest you have developed your understanding of homelessness, demonstrated that you can take an idea from conception and have it ready to bring into the real world, and shown that you are capable of taking the initiative!
“It will never rain roses: when we want to have more roses, we must plant more roses.” ― George Eliot

Making ready for Market!
INTRODUCTION
It’s Sunday morning and you are strolling through your local market when a sign catches your attention. It reads “next Saturday is your market! we invite young entrepreneur to launch their new and innovative homemade products. Book your space now by calling 0800 393939 now”
Handmade products offer a unique story and display human craftsmanship that is often missing in the world of mass production and uniform goods. You are interested and call the number just in time as their is only one space left. The woman on the phone explains that the space is free, and as part of the young entrepreneur market the products sold aren’t expected to be finished products but rather a product prototype. A prototype is an early model of a product built to test the concept. This entrepreneurs market provides an opportunity to test homemade products, see its users reaction and get some feedback. As part of showcasing what it means to be a young entrepreneur, participants are encouraged to share and display the development process of their products so far.
TASKS
You will go through the design development process to generate your prototype. You will then present your homemade product prototype at the young entrepreneurs’ market to see how it is received and get feedback. You have less than a week to come up with your design and make your prototype product. Let’s get to business!
PROCESS
Step 1
Finding inspiration. This step involves doing an initial Brainstorm and Research. Developing and launching a product can be a timely process, and so it’s important to find a balance of doing what you enjoy and developing a product that addresses problem and there is demand for. Your product should be made using resources and processes available in the home as the theme for the Young Entrepreneurs Market is “Homemade”. The first step is to create an initial brainstorm of ideas or areas of interest or problems that your product could stem from.
To guide your research keep in mind:
– Finding a problem to address
– Your interests
– The needs of your local area
– The resources and processes that can be made available to you in the home
– Gather inspiration from other sources. What homemade goods are already out there?
– Unique selling points. What could be your angle?
Looking for inspiration? Why not improve an existing product? Improve can mean many things; to make more efficient, stronger, ergonomic, better value, more emotional value ect. Or you can read here how to help generate ideas.
Step 2
From your initial research, Define your design problem.
“I were given one hour to save the planet, I would spend 59 minutes defining the problem and one minute resolving it” – Albert Einstein
The design problem informs the purpose of your design. You should outline 1) What is the design for? 2) Who is it for? 3) Where and when is it for?
Learn more about how to develop a design problem here and here.
Step 3
Use your design problem to generate your own design brief.
“The Design brief outlines what problem a design will solve. It should be referred to throughout the project to make sure what you are working on will solve this problem.”
(BBC Bitesize, 2020)
Follow this link for helpful tips on how to Create a Design Brief. You can find design brief examples here.
Step 4
Next, Develop your Design Specification. A specification is a set of constraints, requirements and considerations for your design solution. Follow this article to guide the development of your own design specification – you don’t need to answer all the bullet points but rather select the ones that feel relevant to you and your process. Here is an example of a product’s design specification.
Step 5
Part a) Sketch your Initial product Ideas and annotate them. Initial ideas are your first ideas that help express your ideas to yourself and to others e.g. your client. Annotations are notes that helpful to provide clarity to ideas, record design decisions, and gives an opportunity to reflect. Moreover, annotations help communicate your ideas to others. Watch this video for guidance on how to annotate your design ideas.
Part b) Evaluate your initial ideas against your design brief and specification. Select the idea that you wish to continue to develop which best fulfills the need of the user, design brief and design specification. Or perhaps even it is an amalgamation of two initial ideas?
Part c) Make any adjustments or improvements to your selected idea to develop it further and so it meets the design specification, brief and need of the user.
Step 6
It is time to make the prototype! Watch this video about how prototypes are used in a real life setting and for guidance on how to go about constructing your own. We recommend to make your product prototype out of cardboard or foam. However, because the theme of the Young Entrepreneur Market is homemade, maybe you have access to the materials that it will be ultimately be made out of? Or maybe your product is a culinary creation and so edible? In these cases, it makes sense to use the intended materials of the final product.
Prototype made? You are now ready for the Young Entrepreneurs Market! Bring along your designs and development process to display! Share your prototype and explain your concept to your target audience and note their feedback. This way you can continue to refine your design!
EVALUATION
Hopefully this task has given the space for you to take the initiative! Please fill in this short evaluation form: https://forms.gle/Teik6HvAxaRKECht5
On completion of this webquest, learners will develop:
Knowledge
- Factual knowledge about how to plan to achieve goals that are set in a professional capacity.
- Factual knowledge of how to measure achievement towards goals.
- Factual knowledge of how to set personal and professional milestones.
Skills
- Identify opportunities to take the initiative and add or create value locally.
- Synthesize goals and milestones to develop a personal action plan.
- Work independently to achieve goals.
- Adapt to unforeseen changes.
- Refine priorities and plans to adjust to changing circumstances.
- Self-assess skills, talents, attributes, etc.
- Assess how these successes and failures affected their development.
- Assess how to build on experiences and networks to create value.
Attitude
- Appreciation of the motivation required to achieve goals.
- Willingness to work to achieve goals.
- Awareness of the skills needed to respond to unforeseen circumstances.
- Appreciation of my personal successes and failures.
Appreciation of what has been learned through these successes and failures.
CONCLUSION
Through completing this webquest you have learned the product design development process and demonstrated that you can take the initiative.
“They always say time changes things, but you actually have to change them yourself.”
― Andy Warhol, The Philosophy of Andy Warhol